Most of you know I am a firm believer in regular data validation over the course of the year on the measures that matter most to your organization. By spreading the work across the calendar, you minimize the possibility of overloading your staff while still keeping your data healthy and credible. As part of all new client implementations of DRVS, we have been conducting a training session that focuses on narrowing the list of the most important measures and building a plan for performing data validation throughout the year. We also included this content in the Pre-Conference Workshop that 60+ of you attended as part of the 2018 Annual Azara Healthcare Conference this past April/May.
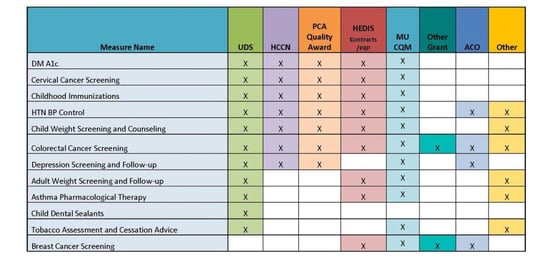
The first step we recommend is to identify which measures are the most important to your organization. We create a document called the Measure Matrix. As you think of the measures to include, look for opportunities to show measure overlap in programs. We know that there are many different flavors of Diabetes A1c measures, for example, but we also know that in the case of measure validation, some of the measure details don’t matter- meaning, if you spend time validating Diabetes A1c >9 or Untested, you are still covering all the most important parts of the measure: denominator, exclusions, and numerator. I tend to list the measures more generically, such as Diabetes A1c, rather than the specific range the measure might require. This allows me to illustrate Diabetes A1c data is relevant across an organization and its many programs.
Once you have gathered all the measures for the various programs, contracts, and grants in which your organization participates, add them to the matrix, and make an X in the column for every program in which measure is included. Next, prioritize them and move measures of priority up toward the top of the list. You may choose to emphasize measures for which: you receive pay for performance incentives, there is significant overlap with other programs, there is a significant population, there is much room for improvement, and/or there is required reporting. Most payer contracts include Breast Cancer screening, so I generally include it, even though it is not presently a UDS measure. A sample Measure Matrix that has already been prioritized is included below.
Now that you have your twelve high priority measures defined, you can start the work of planning out the year of data validation activities. Create a spreadsheet of the measures, and this time organize them by calendar month. Notice that at this stage we recommend you choose a specific representative measure with the specific requirements to be a proxy for all the other flavors of the measure required across other programs, grants, or contracts. This helps ensure everyone is clear about which measure you will use to do the validation work. Please see a sample Data Validation Calendar below.
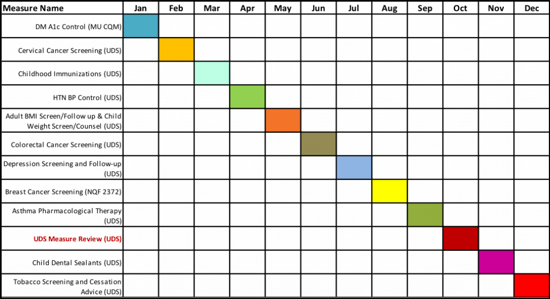
In our sample Data Validation Calendar, I chose to combine the Child and Adult Weight Screening Measures in the same month, because I wanted to be sure I had the month of October available for the UDS CQM Review. Depending on the number of strategic measures you identify, you may have to combine other similar or related measures in a single month. Try to be discerning though; more is not always more. Another benefit of this method is it lends itself to a delegation. If you want to get fancy, you can tack another column on to the spreadsheet above to indicate who the validation champion is for each respective measure. That could mean that a person does all the validation, or it could mean that a person is responsible for organizing the delegation. Additionally, some practices like to follow the month of validation with a Plan-Do-Study-Act (PDSA) cycle on the freshly validated measure.
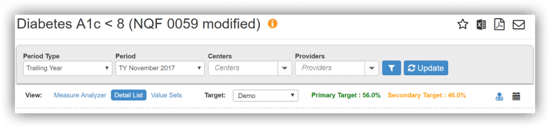
Now that we have a validation calendar, it’s time to discuss how to let DRVS do some of the heavy lifting of the Data Validation for you. In the month of October, as you are getting ready to do your full review, you can create a set of Measure Validation Workbooks in DRVS. If you have the requisite permission, you will see the “Validation Tools” icon at the bottom of the left navigation bar. Click it and select “Measure Validation.” This will bring up a screen that allows you to use an existing set of measures, or if you select the “custom” radio button, you can select any group of measures you’d like. In our use case, you would include all the relevant UDS CQMs for your organization. Select the default period type (probably still Trailing Year (TY) at this point because the year is still not over in October), the specific period (TY September 2018), and the number of patients you want to be generated for each measure. Note this is a multiplier - if you have included eight measures on your list and you select ten patients, you will have a workbook with a list of 80 patients. You can export the workbook to MS Excel, and divide the work among a group of people, or complete it all yourself. At this point, you can go straight to the EHR, look up each patient’s record and ensure that DRVS reflects what you see in the EHR.
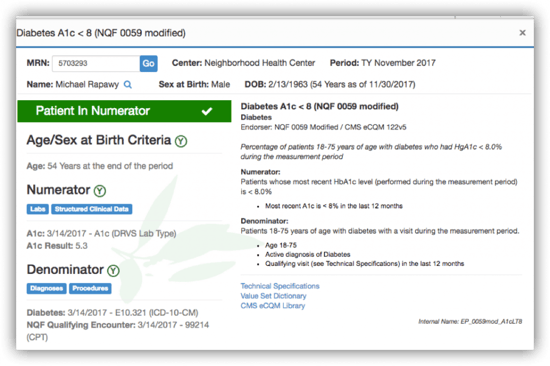
We also recommend using the Measure Investigation Tool (MIT) to help you with the data validation work. The MIT shows you the measure definition, technical specifications, and value set, as well as how DRVS used the specific patient’s data in your EHR to include them in the denominator, numerator, and/or exclusion list. These tools make the job of any validator much easier. You can open the MIT from the patient details section of any measure. If you want to look up a specific patient within a particular measure, you will need to find the icon for the Measure Investigation tool by opening the measure you want to investigate. From the Measure Analyzer, notice the doctor icon to the right of the target information. Click that icon and you will be prompted to use the medical record number of the patient to understand how DRVS calculates them in the measure, or why they are not in the measure population based on various criteria.
Depending on the level of data validation upkeep you have done throughout the year, you may find many issues, or only a few. If you notice mapping issues, please check the Mapping Administration Tool in DRVS to see if you or your DRVS administrator can complete the mappings that need to be updated. If you find you cannot solve the issue internally, please submit tickets with patient examples, using the Azara Support Portal or via encrypted email to support@azarahealthcare.com, so that our support team has the best chance to helping you solve the issue quickly and efficiently.
Additional information on data validation strategies and a recorded version of the recent DRVS Data Validation webinar can be found in the HELP Section within Azara DRVS.
Azara has invested significant effort into providing you with additional data validation tools and measure calculation transparency. We believe with the combination of these different processes and tools, you will be better prepared than ever for UDS 2018 and that you can confidently submit your UDS data on February 15th. Happy data upkeeping and please let us know if these tools have made your or your team’s life easier, or if you have suggestions for ways we can further improve DRVS!
Related Articles

Expanding Care Access Without Increasing Staff: How FQHCs Can Use Data to Work Smarter
Explore Insights
Asthma Awareness Month: Turning Insights into Impact with DRVS
Explore Insights